Welcome to PyAutoGUI’s documentation!
PyAutoGUI lets your Python scripts control the mouse and keyboard to automate interactions with other applications. The API is designed to be simple. PyAutoGUI works on Windows, macOS, and Linux, and runs on Python 2 and 3.
To install with pip, run pip install pyautogui. See the Installation page for more details.
The source code is available on: https://github.com/asweigart/pyautogui
PyAutoGUI has several features:
- Moving the mouse and clicking in the windows of other applications.
- Sending keystrokes to applications (for example, to fill out forms).
- Take screenshots, and given an image (for example, of a button or checkbox), and find it on the screen.
- Locate an application’s window, and move, resize, maximize, minimize, or close it (Windows-only, currently).
- Display alert and message boxes.
Here’s a YouTube video of a bot automatically playing the game Sushi Go Round. The bot watches the game’s application window and searches for images of sushi orders. When it finds one, it clicks the ingredient buttons to make the sushi. It also clicks the phone in the game to order more ingredients as needed. The bot is completely autonomous and can finish all seven days of the game. This is the kind of automation that PyAutoGUI is capable of.
Examples
>>> import pyautogui

>>> screenWidth, screenHeight = pyautogui.size() # Get the size of the primary monitor.
>>> screenWidth, screenHeight
(2560, 1440)

>>> currentMouseX, currentMouseY = pyautogui.position() # Get the XY position of the mouse.
>>> currentMouseX, currentMouseY
(1314, 345)

>>> pyautogui.moveTo(100, 150) # Move the mouse to XY coordinates.

>>> pyautogui.click()          # Click the mouse.
>>> pyautogui.click(100, 200)  # Move the mouse to XY coordinates and click it.
>>> pyautogui.click('button.png') # Find where button.png appears on the screen and click it.

>>> pyautogui.move(400, 0)      # Move the mouse 400 pixels to the right of its current position.
>>> pyautogui.doubleClick()     # Double click the mouse.
>>> pyautogui.moveTo(500, 500, duration=2, tween=pyautogui.easeInOutQuad)  # Use tweening/easing function to move mouse over 2 seconds.

>>> pyautogui.write('Hello world!', interval=0.25)  # type with quarter-second pause in between each key
>>> pyautogui.press('esc')     # Press the Esc key. All key names are in pyautogui.KEY_NAMES

>>> with pyautogui.hold('shift'):  # Press the Shift key down and hold it.
        pyautogui.press(['left', 'left', 'left', 'left'])  # Press the left arrow key 4 times.
>>> # Shift key is released automatically.

>>> pyautogui.hotkey('ctrl', 'c') # Press the Ctrl-C hotkey combination.

>>> pyautogui.alert('This is the message to display.') # Make an alert box appear and pause the program until OK is clicked.
This example drags the mouse in a square spiral shape in MS Paint (or any graphics drawing program):
>>> distance = 200
>>> while distance > 0:
        pyautogui.drag(distance, 0, duration=0.5)   # move right
        distance -= 5
        pyautogui.drag(0, distance, duration=0.5)   # move down
        pyautogui.drag(-distance, 0, duration=0.5)  # move left
        distance -= 5
        pyautogui.drag(0, -distance, duration=0.5)  # move up
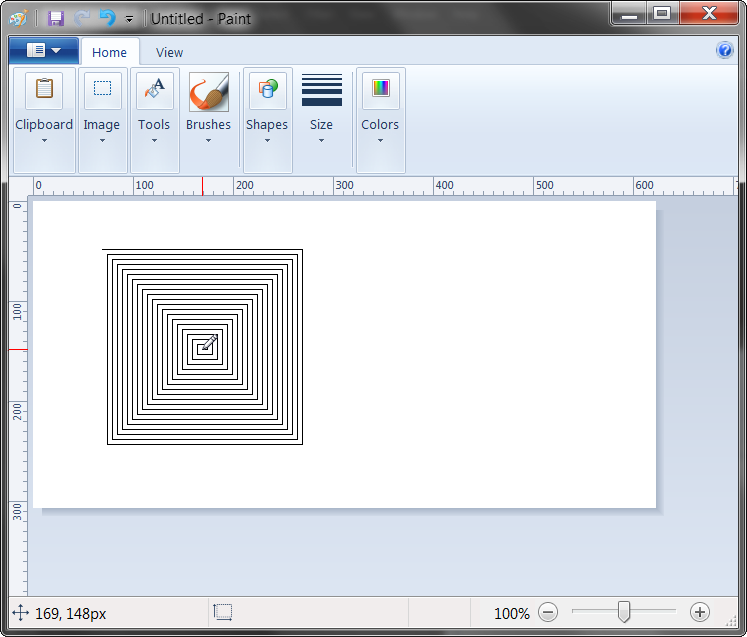
The benefit of using PyAutoGUI, as opposed to a script that directly generates the image file, is that you can use the brush tools that MS Paint provides.
FAQ: Frequently Asked Questions
Send questions to al@inventwithpython.com
Q: Can PyAutoGUI work on Android, iOS, or tablet/smartphone apps.
A: Unfortunately no. PyAutoGUI only runs on Windows, macOS, and Linux.
Q: Does PyAutoGUI work on multi-monitor setups.
A: No, right now PyAutoGUI only handles the primary monitor.
Q: Does PyAutoGUI do OCR?
A: No, but this is a feature that’s on the roadmap.
Q: Can PyAutoGUI do keylogging, or detect if a key is currently pressed down?
A: No, PyAutoGUI cannot do this currently.
Fail-Safes

Like the enchanted brooms from the Sorcerer’s Apprentice programmed to keep filling (and then overfilling) the bath with water, a bug in your program could make it go out of control. It’s hard to use the mouse to close a program if the mouse cursor is moving around on its own.
As a safety feature, a fail-safe feature is enabled by default. When a PyAutoGUI function is called, if the mouse is in any of the four corners of the primary monitor, they will raise a pyautogui.FailSafeException. There is a one-tenth second delay after calling every PyAutoGUI functions to give the user time to slam the mouse into a corner to trigger the fail safe.
You can disable this failsafe by setting pyautogui.FAILSAFE = False. I HIGHLY RECOMMEND YOU DO NOT DISABLE THE FAILSAFE.
The tenth-second delay is set by the pyautogui.PAUSE setting, which is 0.1 by default. You can change this value. There is also a pyautogui.DARWIN_CATCH_UP_TIME setting which adds an additional delay on macOS after keyboard and mouse events, since the operating system appears to need a delay after PyAutoGUI issues these events. It is set to 0.01 by default, adding an additional hundredth-second delay.
Contents:
This documentation is still a work in progress.